
I was asked to provide a recommendation for what computer to buy as part of a dedicated game streaming PC setup. “Sure!” I said, not realizing the sheer depth of the rabbit hole I was jumping into. During my exploration, one thing I did NOT find was one article that tried to explain everything to a total n00b in enough depth that I could understand both what to buy and why to buy it. This is that article–the one I wish I had found first.
This article describes everything you need to buy to get started as a semi-pro game streamer for platforms like Twitch. It explains what you need to buy, why you need to buy it, and most importantly how to choose from among the many, many, many different options available. This is not a rock-bottom “budget” setup, nor is it the best money could buy. It is targeted at people who are looking to break into the world of professional game streaming or at least do it as a serious hobby without totally breaking the bank. If that’s you, read on.
This article does NOT discuss your primary gaming PC or console. I assume you already have a top notch gaming PC. There are many entire YouTube channels dedicated to figuring out the answer to this question (Gamers Nexus, Hardware Unboxed, JayzTwoCents, and Linus Tech Tips are among my favorites–and I have watched them A LOT). This article discusses everything you need in addition to your gaming PC (or console) and assumes you are using a dedicated secondary PC for streaming, and that you currently own nothing else.
tl;dr
For the impatient, here’s a shopping list. Prices are for mid-August 2020 and some of them (particularly power supplies, cameras, microphones, and capture cards) may cost a bit more due to COVID-19-related shortages. If you bought everything, it would total around $2400. All the links below are Amazon affiliate links, but some items are cheaper elsewhere.
- Streaming PC Components (~$1320)
- CPU: AMD Ryzen 5 3600 ($175)
- GPU: EVGA GeForce RTX 2060 KO Ultra Gaming ($320)
- Motherboard: MSI B450 Tomahawk Max ($125)
- Memory: Team T-Force Vulcan Z DDR4 16GB 3200 CL16 ($55)
- PSU: Thermaltake Toughpower GX1 500W ATX 80+ Gold Certified ($80)
- Capture Card: Elgato 4K60 Pro MK.2 ($200)
- Cam Link: Elgato Cam Link 4K ($130)
- Case: Lian Li Lancool II Mesh ($130) or Phanteks P400A ($95)
- OS Drive: ADATA XPG SX8200 Pro 256GB M.2 NVME SSD ($50)
- Storage Drive(s): 4TB 5400rpm 3.5″ HDD ($90) WD Blue or Seagate Barracuda
- Stream Monitor (flat and curved options–you only need one):
- Flat: BenQ GL2480 24″ 1080p 75Hz ($120)
- Curved: Samsung C24F390 24″ 1080p 60Hz ($140)
- Camera Setup:
- Camera (2 good options):
- Sony A5100 ($450)
- Canon M200 ($485)
- Mounting (only need one or the other):
- Tripod: Neewer 70″ tripod/monopod ($45)
(you can get cheaper ones, but I chose this one for the additional height) - Stand/Arm: InnoGear Heavy Duty Mic Stand ($26)
- Tripod: Neewer 70″ tripod/monopod ($45)
- HDMI Cable: ANNNWZZD Micro HDMI to HDMI Cable 3m ($13)
- Camera (2 good options):
- Microphone Setup:
- Microphone: Elgato Wave 3 ($160)
- Pop filter/Windscreen: (included with mic stand)
- Stand/Arm: InnoGear Heavy Duty Mic Stand ($26)
- Elgato Stream Deck (optional): 15-key ($150) or XL 32-key ($250)
- Lights: HPUSN Softbox Lighting Kit 85W 5500K ($70)
No Silver Bullets or Free Lunches
Below I’m going to dive into the why behind each of the components I’ve listed just now, but it’s important to start by pointing out that just having good equipment does NOT mean you will have a good stream. It’s really important that you take the time to:
- Learn to use each piece of equipment
Read the manuals, watch tutorial videos, join online forums and discuss your settings and configurations with other people using the same or similar equipment. - TEST, TEST, TEST
Spend time tweaking and adjusting your setup, do some actual streaming, and ask your audience for feedback on what is working and what isn’t.
In the same way that buying a really expensive pair of basketball shoes won’t magically allow you to dunk, or getting a top-of-the-line guitar won’t instantly make you a rock star, just having good equipment won’t make you a famous streamer. There’s no substitute for time, study, and experimentation. Have fun with it and don’t be afraid to make epic fails.
What is Each Component For?
Let’s start by exploring what each piece of equipment contributes to your overall stream quality.
Audio
I’m starting with audio because good audio is frequently considered to be more important than good video (the video below gives an effective 3 minute demonstration). This is an incredibly complex topic! Some people make their entire career by being an audio engineer. I say this not to scare you but to encourage you to dive deeper and learn more about this topic, and also to let you know that the tips below only barely scratch the surface of what there is to know about high quality audio.
Audio Sources
All of the audio in your stream is important. Not all of them are desirable. Here are the most common sources of sound, where they come from, and how they get into your stream.
- “Good” Sounds
- Game Audio
The audio coming from the game itself. You probably want at least some of the music and sound effects from your game in your stream. The main way it should get into your stream is via the HDMI cable connecting your gaming PC to your streaming PC. It should NOT enter your stream from any sort of external speakers which could be picked up by your microphone. Turn off any speakers from your gaming PC. - Your Voice
Another desirable source of audio is your voice. (Duh. This may seem obvious but you’ll understand why I’m pointing it out in a moment.) Your voice enters your stream via a microphone, preferably connected directly to your streaming PC. - Sound Effects
Many streamers like to spice up their streams by adding in their own sound effects–explosions, bells, whooshes, etc. You as the streamer will trigger these effects yourself while streaming, usually with macro keys or something like a Stream Deck. Your sound effects should be generated by your streaming PC as well. - Music
You may want to add in your own music. This should be generated by a music player, again on your streaming PC.
- Game Audio
- “Bad” Sounds, i.e. Noise
- Ambient or Room Noise
Microphones (usually) can’t tell the difference between good sounds, like your voice, and bad sounds, like your barking dog, or other people in your house, or a garbage truck driving down your street. You need to think about how to reduce ambient noise as much as possible. - Interference or Electronic Hum
All electrical devices generate electromagnetic fields made of waves. At certain frequencies, these waves may look to your computer just like the “good” sounds listed above. This gets into your stream via the circuitry of your computer itself, but it is mitigated by using high quality equipment and configuring it correctly. - Other Programs
While streaming, don’t forget to mute your phone and turn off all unnecessary programs on your computers. Random alerts, alarms, and other program noise can get into your stream either directly via one of your computers or through your microphone.
- Ambient or Room Noise
Controlling Audio Sources
So how do you control these audio sources to maximize the good sounds and get rid of as much noise as possible? Here are the typical approaches.
“Soundproof” Your Room
There are many levels of “soundproofing.” Professional recording studios spend many thousands of dollars building rooms within rooms within rooms to isolate them from virtually all external sounds. This is mostly unnecessary for a streamer and you can get rid of a lot of sound by doing simple things like closing your door, filling your room with stuff, and covering walls and other flat (i.e. sound-reflective) surfaces with blankets. Here’s a good short video that describes a cheap vocal booth made with PVC pipe and moving blankets.
Use a Mixer
A “mixer” is a piece of hardware or software that takes multiple audio inputs and can control the level of output for each input. You will take all of your “good” sounds above and run them into a mixer which will allow you to control the relative levels of game audio, music, your voice, and other sound effects that your audience will hear. The GoXLR is an extremely popular hardware mixer for streamers, but fortunately, you can save the $500 it would cost you to get one because the Elgato Wave 3 I’ve recommended comes with a software mixer that appears to be really excellent.
Now is probably as good a time as any to recommend this video from EposVox that gives a deep dive into the Elgato Wave. This is an AMAZING YouTube channel and you’ll probably end up watching and re-watching many hours of EposVox videos as you progress toward becoming a professional streamer.
Use Pre/Post-processing
“Pre-processing” and “post-processing” are features of your microphone and streaming software that allow you to do things like control the sensitivity of your microphone (i.e. how much and what kinds of sound it picks up) and use noise cancellation, like with noise cancelling headphones. You can also add effects like reverb to give your voice a richer quality. There are many, many, many videos on YouTube with tutorials on how to tweak your audio this way.
Adjust Your Bitrate and Sampling Frequency
These are related and fairly technical topics. The “bitrate” is the amount of audio data being sent through your stream. The “sampling frequency” is the number of times per second your microphone samples the sound coming from your voice. The higher the bitrate and sampling frequency, the higher quality your audio. However, if these values are too high, your internet connection and the bandwidth of your audience can make your audio terrible. Your streaming software will likely provide you with some reasonable default values. You should absolutely check in with your audience to make sure they’re getting clean sound, but once you find good levels, you shouldn’t have to tweak these all that much.
About Microphones
There are MANY kinds of microphones. You should spend some time learning about what they are, how they work, and why some are better suited to streaming than others. In general, though, the debates in the streaming community tend to center around two issues: XLR vs. USB, and dynamic vs. condenser. Here are a couple of good videos that explain the debate.
Why did I recommend the Elgato Wave 3?
The Wave 3 is a USB condenser microphone, two things that EposVox says he specifically tells people to avoid. That said, EposVox’s review of the Elgato Wave that I linked to above addresses these issues and explains why I am passing on his recommendation to you. In short, for getting started with streaming without spending a fortune on audio equipment, the Wave 3 offers a TON of features, particularly via the software. However, you will have to invest significant time in tuning the Wave 3 to your setup. Like I said earlier, good equipment is not magic. You have to learn to use it like a pro. You will want to use your mic stand, pop filter and the general configuration to decrease things like keyboard noise, your squeaky chair, or deafening your audience by banging on your table.
Video
Let’s jump right in. There are typically three sources of video:
- Your Game
Duh. The video feed from your gaming PC gets sent to your streaming PC via an HDMI cable that connects the graphics card on your gaming PC to the capture card on your streaming PC. - Your Camera
You’ll send video from your camera to your streaming PC via an HDMI cable that runs directly between the camera and the cam link device plugged into a USB port on your streaming PC. - Overlays, Alerts, and Other Effects
To spruce up your stream, you may want to have an overlay and/or use alerts and other effects for interacting with your audience. These things will be configured within your streaming software (i.e. OBS) and controlled via macro keys on your keyboard or using another device like a Stream Deck.
What are the factors that contribute to high quality video?
Compression
Video generates A LOT of data. You already know that if you want to play games at 4K with a high refresh rate like 240FPS, particularly with AAA games, you need a truly beefy, high-end graphics card in your gaming PC. There’s virtually no way that your audience would be able to watch you game at that level of quality without investing tens or hundreds of thousands of dollars in a professional broadcasting studio. One of the primary benefits of having a separate, dedicated streaming PC is that you can still play your games with high settings, but stream your gameplay at a much lower level of quality that won’t break the internet. In order to accomplish this, your streaming PC will compress your video into a smaller size before sending it to your audience. Video compression will be handled on your streaming PC and the way you do it depends on your hardware and software. The key concerns are how it is being compressed (the algorithm) and what is doing the compression (your CPU or your GPU).
Algorithms
You’ve probably heard algorithms talked about, but may not have understood exactly what they were. Algorithms for video encoding are sometimes referred to as “CODECs” which is short for COmpression/DECompression. The algorithms are usually created first by programmers at big software and/or hardware companies, and then over time they get adopted by other companies and people until they evolve into a “standard,” which is a generally agreed-upon way of doing something. Since the patent of a CODEC is typically owned by the company that creates it, when they are new, those companies charge a fee to other companies who want to use it. Those fees can be pretty expensive, which is why sometimes everyone uses an older standard when a newer, better one exists. CODECs go by names like H.264 or H.265, but confusingly, in addition to these names, companies will brand these algorithms with “fancier” names like MPEG-4 AVC (H.264) and HEVC (H.265).
Encoding Hardware
All of your video sources will get sent to your streaming PC on which your streaming software (i.e. OBS) will handle combining and compressing them into a streamable size. Within OBS you can configure where this compression takes place, either on your CPU or GPU. Until a couple years ago, most compression happened on the CPU which is why you may have seen recommendations for streaming PCs that didn’t even have a dedicated graphics card. (BTW, if you are gaming and streaming on the same PC–no separate streaming PC–you’ll want to use a CPU-based method to balance everything out.) Then Nvidia started a collaboration with the OBS studio team to create NVENC, which is a dedicated video compressor built into Nvidia graphics cards.
What’s the best Algorithm/Hardware Combo?
Again, it’s EposVox to the rescue. He did a fantastic benchmark comparing the compression quality of a variety of encoders for various bitrates. Fortunately for us, the results pretty clearly show that you can get the best quality by using any Turing-based Nvidia graphics card (that means a GTX 1650 Super and up). Even better, Nvidia clearly says that they use the exact same encoder in ALL of their Turing-based cards, so you don’t have to get the most expensive one–a GTX 1650 Super ($175) will compress your video just as well as an RTX 2080ti ($1400+). Unfortunately for us, Nvidia’s dominance in this area means there’s not enough competition to bring prices down. While AMD has fantastic cards for gaming you should not use an AMD card in your streaming PC. This video is well worth the watch.
What should my target resolution and bitrate be?
Nvidia has helpfully released a guide for using NVENC with OBS. There’s a table which dictates the best resolution and bitrate you can target based on the upload speed of your internet connection. First use SpeedTest.net to find your upload speed. Here’s a screenshot from my system. We pay a premium for the fastest consumer-grade internet we can get in a kind of rural area.
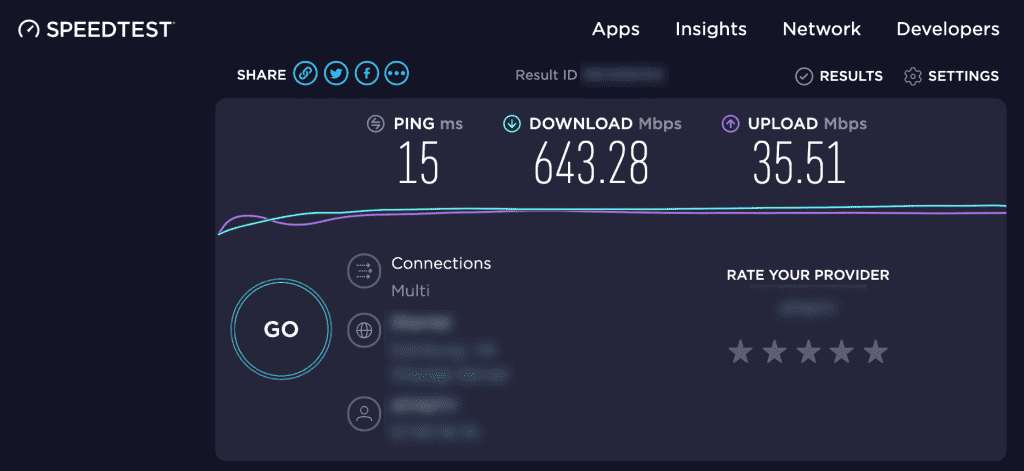
Once you know your upload speed, you can look up the max resolution and bitrate that your system could possibly handle, in my case it looks like I could handle streaming to YouTube at 1440p 60FPS. That said, knowing where you’re streaming to is really important. Most game streamers stream to Twitch. Twitch has three tiers of streamers: starters, “affiliates,” and “partners.” One of the key differences between these tiers is how Twitch handles incoming streams.
Unless you are a partner, Twitch basically just passes your stream directly on to your audience at the same bitrate that you send it. If you try to stream at a speed that is too fast for your audience, they will experience buffering or stuttering. This will make it extremely difficult for you to build up your followers. Once you are a partner, Twitch will adjust the bitrate of your stream to match the speed of your audience’s internet connection. That means that if you are a partner, you want to stream at the highest rate possible so that audience members with a fast internet connection can watch your stream in its full glory. If you are not a partner, though, it’s typically recommended that you stream at a much lower speed, basically capped at 6mbps or roughly 900p 30FPS. You may even want to reduce your video stream to 720p.
The Components
Okay, let’s finally get down to the individual components I’ve recommended any why.
GPU–EVGA GeForce RTX 2060 KO Ultra Gaming
Earlier I made the claim that ALL Turing-based GPUs can compress video using the latest NVENC encoder so there was no need to buy a GPU more expensive than the GTX 1650 Super which currently costs around $175. While this is true, the newer RTX cards will be able to take advantage of Nvidia’s new RTX Broadcast Experience which can enable some cool newer features like an AI-based real-time background removal that you can accomplish without actually having a greenscreen. This was announced in September 2019.
CPU–AMD Ryzen 5 3600
While it’s important to have a multi-core processor, Alpha Gaming (another excellent YouTube channel for learning how to become a pro streamer) did a convincing benchmark that showed that if you are using NVENC, you don’t actually need a very powerful processor to add all kinds of overlays and effects without dropping frames. The R5 3600 is well known for providing huge value at a lower price.
Motherboard–MSI B450 Tomahawk Max
The B450 Tomahawk is generally known as the “go to” motherboard for balancing reliability with features. Since the streaming PC has no hardware that takes advantage of PCIe 4.0, there’s no need to buy a newer X570 or B550 board. You could probably get away with a cheaper B450 board (which go for under $100), but I picked the Tomahawk not only for its reputation but also its support for USB-C. While none of the current components require USB-C, camera companies like Canon have already begun to release software that will allow a direct streaming connection to a computer without the use of Cam Link.
Memory–Team T-Force Vulcan Z DDR4 16GB 3200 CL16
Honestly, you would probably do just fine with 8GB of RAM. OBS does not use a lot of memory, and NVENC does all of its encoding directly on the GPU so doesn’t use a lot of system memory either. There was only about a $20 difference between 8GB and 16GB, though, which is why I went with 16. It never hurts to have more memory.
PSU–Thermaltake Toughpower GX1 500W ATX 80+ Gold Certified
Really, any 500W power supply will do. I chose an 80+ Gold certified supply because its higher efficiency will produce less waste heat. While there’s not a lot of risk that this computer will get too hot, it’s always a good idea to opt for more power efficiency.
Capture Card–Elgato 4K60 Pro and Cam Link–Elgato Cam Link 4K
These products seemed far and away to be the “go to” choices in this category. They got high reviews from every reviewer and compared to every competitor I could find. Since the Wave 3 microphone and the Stream Deck are also Elgato products, I reasoned that there may be benefits to having a suite of components all from the same company. There’s also going to be plenty of places to get tutorials and support in configuring these products.
Case–Lian Li Lancool II Mesh or Phanteks P400A
Since this is an air-cooled build and we are not putting in any sort of after-market cooling solution, I went with the cases that scored at the top of the list for thermal performance and value as rated by Gamers Nexus. While not the cheapest on their list, these cases come with included fans that will prevent having to buy extra ones later.
Drives: XPG SX8200 Pro 256GB SSD and 4TB WD Blue or Seagate
The SSD is for the OS and will ensure fast boot times. I added a large HDD for storing large uncompressed video files. While it’s not necessary to actually record your stream to disk, if you want to go back to a gaming session later and turn it into a highlights video or something else, you’ll need storage space for that.
Stream Monitor
I made a couple of recommendations–one flat, one curved–but really any monitor that can connect to the GPU on your streaming PC will do. Basically, you’re going to want a 2nd monitor in addition to your gaming monitor on which to be able to host chat and otherwise monitor your audience.
You probably do NOT need a second keyboard and mouse for your streaming PC although it’s always good to have a backup. You can use software like Synergy ($30) or InputDirector (free) to control both computers with one keyboard and mouse. I don’t have any experience with this but one comment I saw said that once the stream has started they have almost no reason to switch to the streaming PC and you can use the Stream Deck to program macros for common operations on the streaming PC.
Camera–Sony A5100 or Canon M200
These recommendations came from the Alpha Gaming video below. For purely streaming, where the video of your face is a small thumbnail in the corner of your screen, any good quality webcam will do. However, if you want to do anything full screen, like a YouTube video, you’ll want a better camera for that. The key feature you need from a DSLR for streaming is that it has to output “clean HDMI.” DSLR cameras can run into the thousands of dollars, so $500 is relatively affordable compared to that. These cameras can supposedly be found used on places like eBay for considerably less if you’re on the lookout.
If you tend to be a gamer who bangs on the desk a lot, you might want to get the tripod instead of the stand that clamps to the desk. The cameras have built-in stabilization but if you want to keep your camera stream smooth, the tripod means it won’t be mechanically attached. The downside is you need more room behind your desk to use a tripod.
Microphone–Elgato Wave 3
I think I already talked enough about this in the audio section above. As far as audio quality is concerned the Elgato Wave 1 is supposed to be equivalent and a bit cheaper than the Wave 3. The key feature I liked about the Wave 3 is the ability to mute it with a tap.
The other thing I like about the Elgato Wave software is that it allows you to have a different mix of audio sources going out to your stream and to your headphones at the same time. You can switch back and forth between them to fine tune what your audience hears.
Elgato Stream Deck
The last piece of hardware to discuss is the Stream Deck. I’m not going to say much here since I’ve never personally used one of these, but this review makes it sound like it would become pretty indispensable pretty quickly if you got used to using one and it could add a lot of interactivity to your stream.
Odds and Ends and Conclusion
There is A LOT you need to learn to become a professional level streamer. You don’t actually need to buy any hardware at all to get started (see LTT video below). However, if you’ve gotten to the point where you think you’d like to make it as a professional or even as a serious hobby, the list in this article is designed to allow you to stream on Twitch at the highest quality recommended for non-partners. Chances are, if you get to partner status on Twitch, you’ll already be generating enough income and have enough experience to know which components you’ll want/need to upgrade and you’ll have enough money to do so.
Two areas that I have basically not addressed at all here are what goes behind you in your room or how to soundproof your gaming space. These are serious considerations in themselves and you’ll want to address them pretty soon in the process. There are lots of videos and articles out there that describe DIY solutions to a lot of the