
In Part 1 of this series, I introduced VStripeElements, an NPM package that I wrote to be able to use functionality of Stripe Elements with the power and beauty of the Vuetify UI library. Part 1 described the goals and end product of the project, and gave an overview of the project structure. In Part 2, I will dive more deeply into the elements of the dev environment.
Organization
To organize this part, I’m going to use the scripts section of the package.json file for this project, which looks like this:
Almost all of the dev dependencies included in this package are required by these scripts in some fashion, so this seems like a pretty good way to break down this analysis. I’ll try to cover them in an order that builds from the simpler scripts to the more complex ones.
commit
I had never heard of Commitizen before I started contributing to the Vuetify project. Basically, commitizen hijacks your git commit commands and forces you to use a consistent and informative commit message style. These commit messages then get automatically compiled into your release log so you can keep people up to speed on the evolution of your package without much extra effort. This is a pretty genius idea, and I intend to use it on pretty much every project I do from now on.
tsc
The three TypeScript config files (tsconfig.*.json) for this project are a simplification and amalgamation of the five tsconfig files in the Vuetify project. These files control how TypeScript source code gets transpiled into JavaScript. There are three different transpilation contexts that have to be considered:
- Testing
This produces the JavaScript required by Jest to run unit tests. Jest’s testing engine is the only client to consider here, and for that we want to output our code in the CommonJS module format. - Development
This produces the JavaScript required by the webpack dev server that is running constantly in the background during coding. Since you’ll want to be able to see and read your code in order to debug it, it’s not necessary to minify or create source maps in this context. - Building
This produces the JavaScript that will be minified, bundled, and exported for other people people to use, i.e. the people who will eventually consume this package.
In order to handle transpiling for these contexts, all of the scripts start with the core tsconfig.json file. This file is used “as-is” for dev builds. The tsconfig.dist.json and tsconfig.test.json files import the base config file and overwrite/add the settings necessary for those contexts.
build:lib
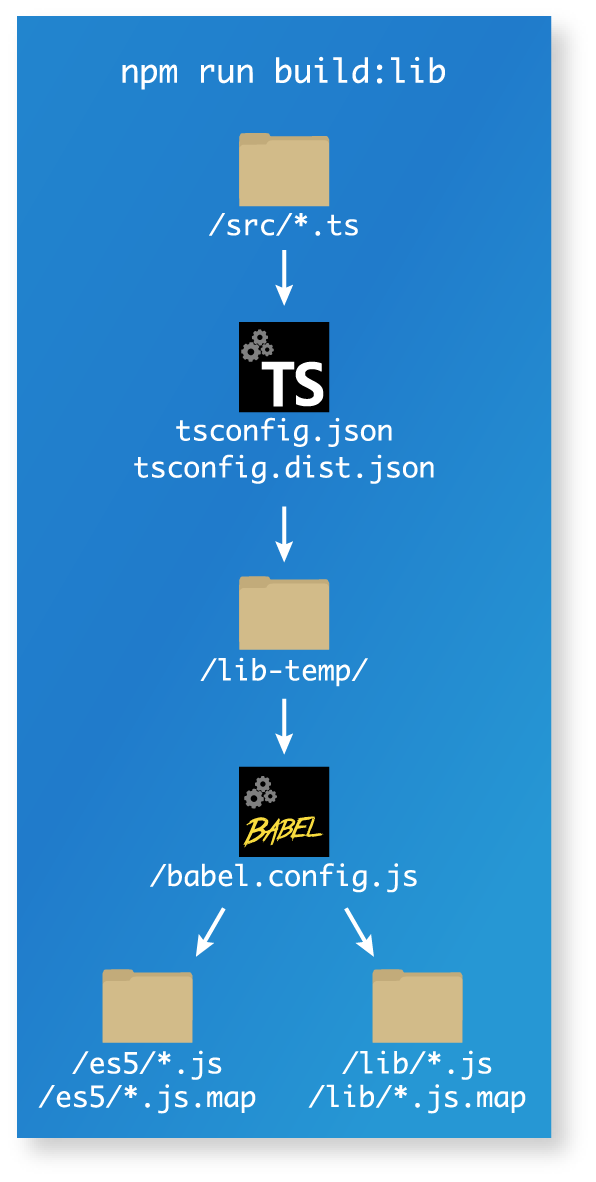
The build:lib script converts the TypeScript code in your /src directory into JavaScript modules suitable for being imported into other projects. More specifically, it runs a shell script (/build/lib.js) that uses the TypeScript compiler (tsc) to first transpile the TypeScript into ESNext code that gets stored in /lib-temp. Then it uses Babel to convert the ESNext code into ES5 (/es5) and ES6 (/lib) code. It does not process the SASS files at all. These files remain untouched in the /src folder to be imported and processed by whatever build system is used by the people who will eventually use your component. Note that this script does not use webpack, and it is rare that you’d need to invoke this script on its own. It gets invoked by the more general build script that builds all of the assets required for distribution by your completed project. The config files that are used by this script are noted in the diagram.
test
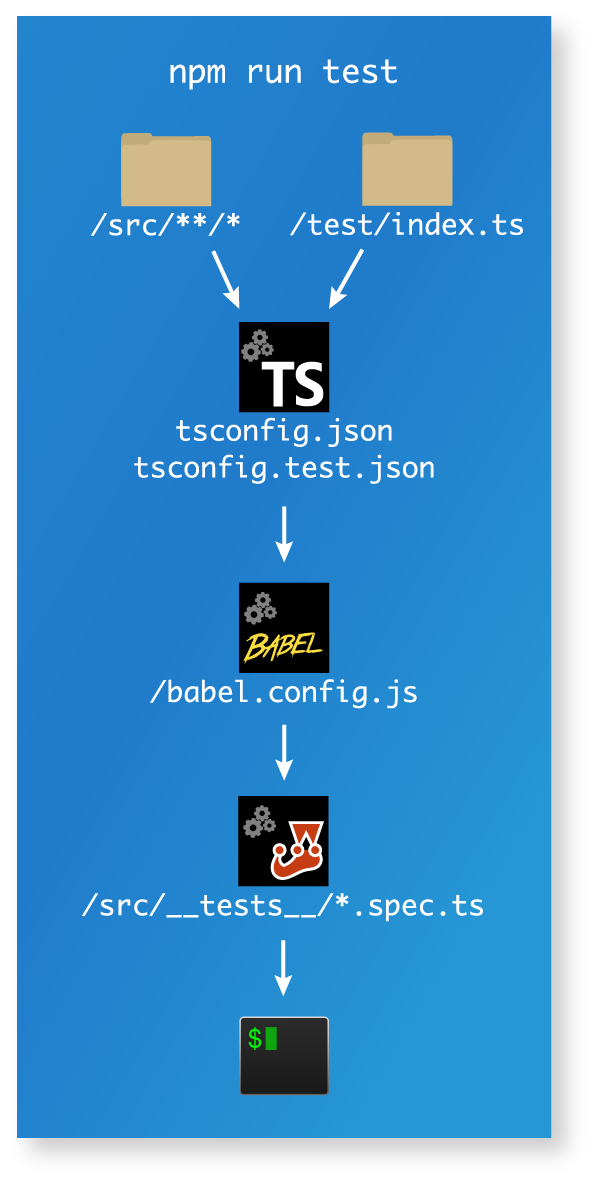
The test script uses Jest to run unit tests for your extension. It first converts all of your TypeScript code into CommonJS format using the TypeScript compiler and then passes that through Babel using your babel.config.js settings. The output of your tests shows up in the terminal, and if you run test:coverage it also outputs coverage info for all the files in your src/ folder, as well as saving coverage data in the coverage/ folder.
All of the config files used in this process are noted in the diagram. The test/index.ts file deserves special mention. If you follow the same approach to component development as Vuetify, the components you generate are what are known as “functional” components, i.e. the component is generated by a render() function rather than being patterned off of a template property. In production, it is possible that you may need to generate a tree of components this way, but in testing this is not necessary. The test/index.ts file exports a utility functionalContext() function that makes it easier to mock components when you test.
The jest.config.js file makes use of the ts-jest plugin. This plugin makes it possible to test TypeScript files with Jest, which is really designed just for testing JavaScript. Our tests also make use of the @vue/test-utils, a package that helps to mount our components in memory during testing. You can run the tests in “watch” mode by running npm run test:watch.
Running tests also produces what are known as “snapshots,” or snippets of HTML that are generated by your custom component. Jest will test the HTML generated by your component against the HTML in the snapshot to determine whether your test passed or not.
Scripts that use webpack
The dev and build:dist scripts both use webpack to process both the TypeScript source code files and the *.sass files that you write. Webpack is an extremely powerful and complex package that coordinates all of the steps necessary to convert your source files into production-ready code, including (but not limited to):
- Handling CSS-related tasks like:
- finding style files that have been included via
require()orimportstatements from JavaScript - extracting style rules from
.vuefiles - converting SASS/SCSS into regular CSS
- adding prefixes to various style rules to make sure that CSS will be applied consistently across various browsers
- combining all of the CSS files into one file to reduce the number of downloads on the client side
- minifying and zipping these files to reduce their size
- renaming the combined, minified, zipped files appropriately
- finding style files that have been included via
- Copying static assets (images, fonts, etc.) into the appropriate folders for distribution
- Handling TypeScript/JavaScript-related tasks like:
- extracting TypeScript/JavaScript from
.vuefiles - transpiling TypeScript into JavaScript
- importing and including code from 3rd party libraries
- “tree shaking” i.e. only including the minimum amount of 3rd party dependencies necessary to make your package work
- converting JavaScript into build targets (e.g. ES5, ES6, etc.) suitable for the specified contexts
- combining JavaScript files into one file to reduce downloads
- adding in appropriate polyfills (e.g. using
core-js) to ensure consistency and compatibility across different web browsers - minifying, obfuscating, and zipping the combined JavaScript files to reduce file size
- renaming the files appropriately
- extracting TypeScript/JavaScript from
In addition to all of these things, webpack has a built-in web server that can be spun up for use during development. It can also watch your source files for changes, compiles, build and “hot swap” them in real time so that the impacts of changes to your code can be observed in a browser in real time.
It’s important to note that webpack does not actually do all of these things by itself. Rather, almost all of the above functionality is actually effected by plugins and 3rd party libraries (like tsc, and Babel), each of which has to be configured to do it’s particular task. Webpack’s main role is in coordinating all of this activity. Even coordination can be supported by 3rd party code–in our project we use a package called happypack to make all of the above tasks run in parallel threads, which speeds up build times and makes the whole development effort much more pleasant and efficient.
With a package as complex as the one we’re building, you end up with multiple nested configuration layers, and it is enormously confusing to try to understand and keep track of them all. The next three sections will try to explain how all of the pieces fit together.
dev
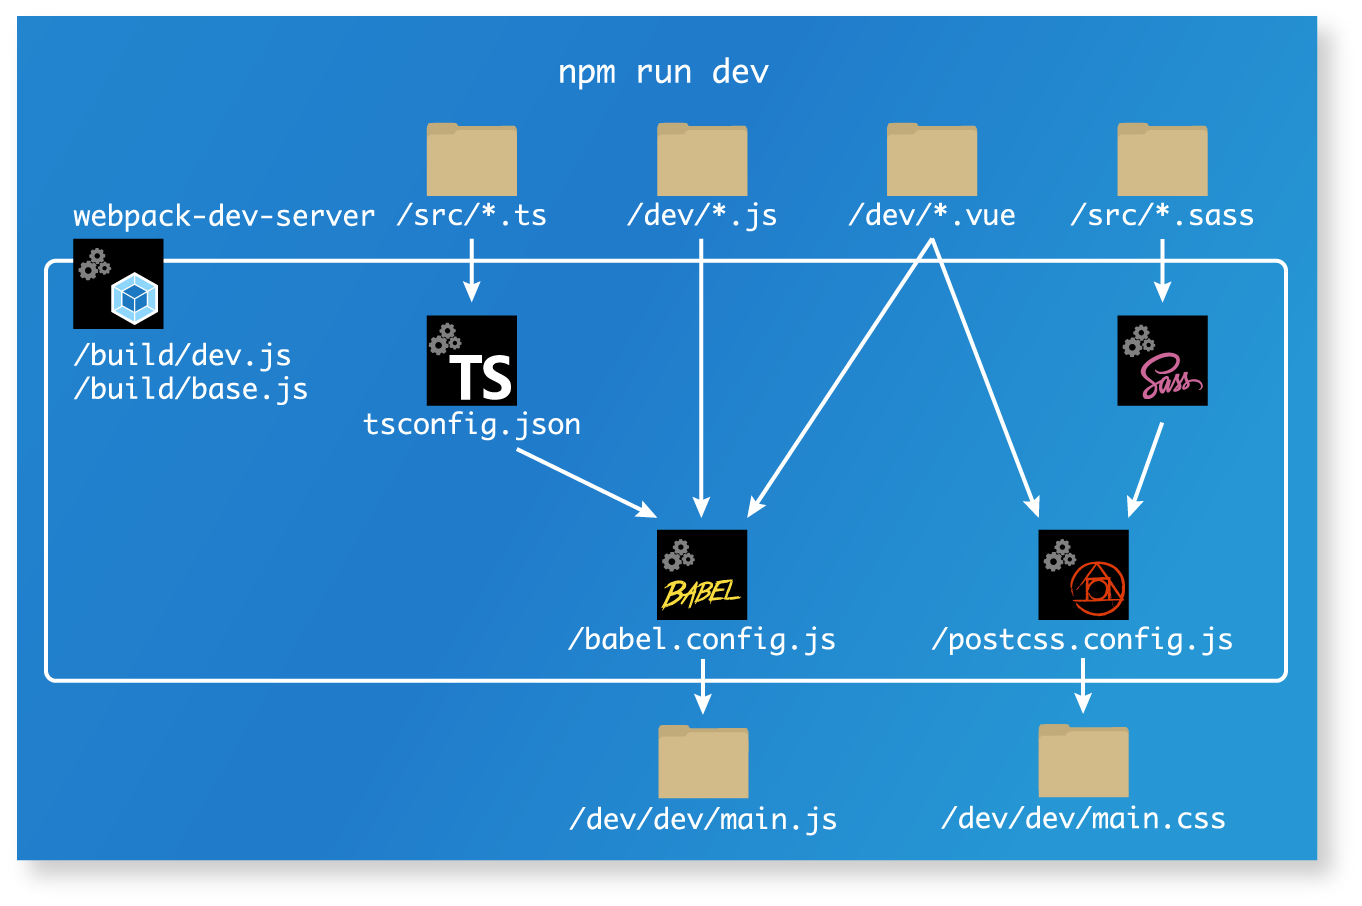
The dev script runs a local dev server that is designed to be used by the extension/package developer during development. When you run the script, it:
- fires up the webpack dev server,
- transpiles the TS code of your extension,
- combines it with the JS in
dev/index.jsanddev/App.vue, - runs it through the Babel processor and pulls in the
core-jspolyfill, - gets your SASS code from your extension,
- processes it and combines it with any styles in
dev/App.vue, - runs it through the postcss processor, and
- spits out two files:
dev/dev/main.jsanddev/dev/main.css
This is basically the same thing that happens when you run npm run serve from the root of a Vue project. The happypack package speeds up this process by making all of the above processes happen in parallel, and the resulting files are updated on the fly every time you make changes, which is known as HMR or “hot module replacement.” All of the config files that are involved in the process are noted in the image above.
To see the result in your browser, simply open it to the page that is indicated on the console when webpack dev server starts. It’s important to note that the CSS and JS files produced by this process do not get saved in your project and are destroyed when you shut down the server. As you work, you’ll get helpful debugging information in the terminal, as well as in the browser’s developer console.
build:dist
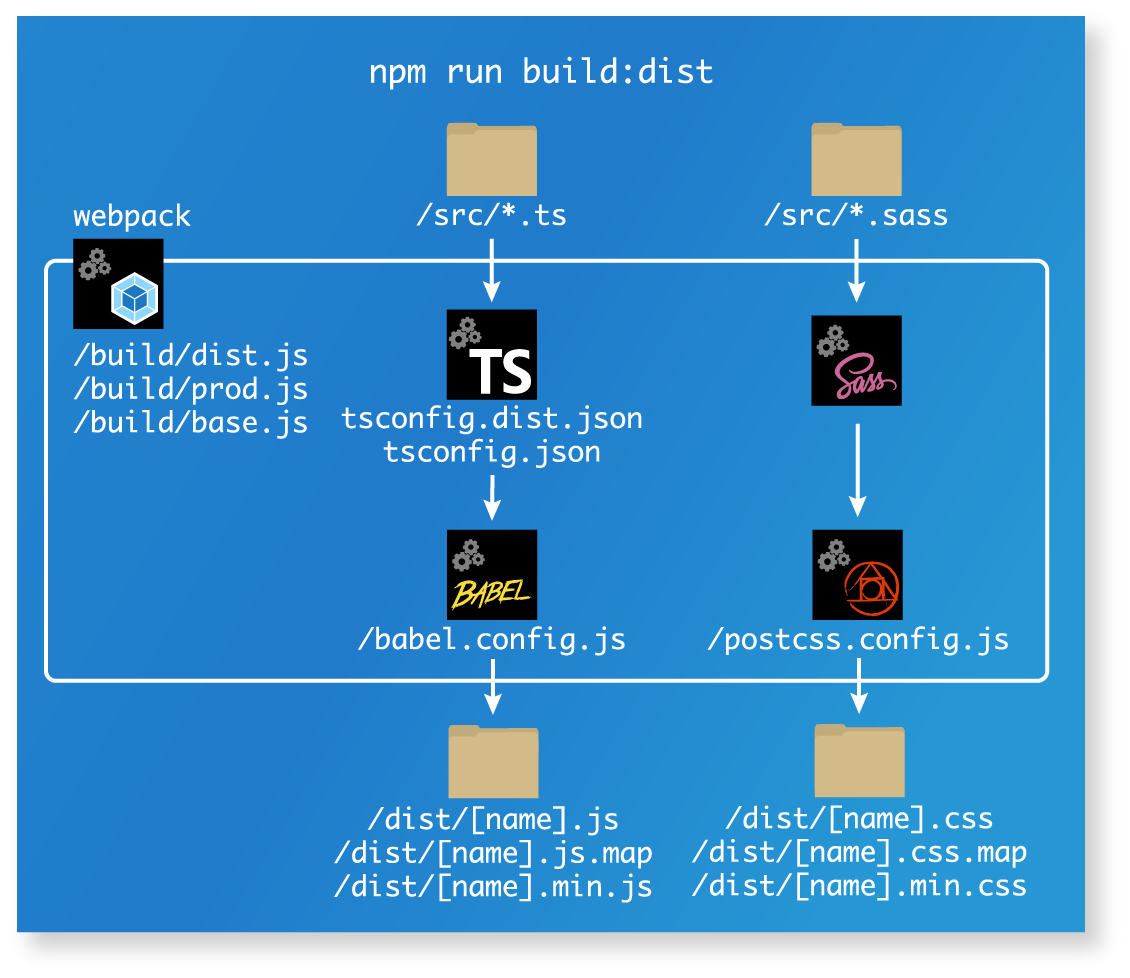
The build:dist script is what packages the component for use directly in web browsers. All of the JavaScript is bundled into a single JS file, and all of the styles are bundled into a single CSS file. Minified and mapped versions of both of these files are also created. The way I set it up, the [name] given to these files is the name of the package as listed in the name property of package.json. The goal here is to get the files as small as possible and to make it so that people who want to use your component can do so by importing a single JS file and a single CSS file. You can see a demo of this in the CodePen playground I created for my component.
Other Scripts
In addition to the scripts we’ve described so far there are a few others. Some of them are just shortcuts to run other scripts or combinations of other scripts. The build script runs build:lib and build:dist and is designed to be run after any changes have been made, and before a new version of the component is to be published to the NPM repository. The various test:* scripts use slightly different configurations for running tests in different operating systems. The lint:* scripts use tslint and eslint to check the style and syntax of the code.
The release script bears special mention. I decided to use the Semantic Release package to manage releases of my component and enforce best practices in that area. To be honest, I’m still pretty new to this package, so still am not fully comfortable with its workflow, but it forces me to stick to the best practices of semantic versioning. Up until this point, I had been a bit haphazard in my approach to assigning version numbers, but I was persuaded by the SR docs that I really shouldn’t be that way. If you decide to build and release a package, I very much encourage you to use SR.
Conclusion
Honestly, it took me well over a week to really understand how all of the puzzle pieces I’ve described in this post fit together. That all had to happen before I was actually able to do any coding! I’m absolutely sure that there’s still room for more improvement. As just a guy working by himself in his spare time, it’s a daunting task to build and release a high-quality, broadly compatible extension of Vuetify and do it in TypeScript with the same care and attention to detail as John Leider and the Vuetify team have done.
I hope to make this easier for more people to do. In the next installment of this series, I’m going to introduce my Vuetify extension template and walk you through the steps of getting it set up, and starting writing your own code. I hope you’ll follow it and make some amazing stuff for all of us to use!
Webmentions
[…] us, it would behoove you to go back and read the earlier installments of this series: Part 1, Part 2, Part 3, and Part 4. In this installment, we’re going to pick up where we left off. More […]
[…] Part 2 gave a detailed explanation of the development environment necessary for you to build your own packageable Vuetify extension. […]
[…] I built to apply Vuetify styling to the credit card inputs provided by Stripe Elements. In Part 2, we took a deep dive into the development environment necessary to do this on your […]
[…] Part 2 of this series, I’m going to take a deeper dive into the dev environment and describe what each of the […]