Recently I’ve been building a progressive web app (PWA) using VueJS as the frontend framework, FeathersJS as the backend API, and Auth0 as my authentication-as-a-service provider. Knitting these three components together turned out to be more difficult and time-consuming than I anticipated–not because it is difficult, but because of some fundamental misconceptions I had about how each one operates. In this blog post, I hope to capture my learning process, pinpoint why it took me so long to break out of an old mindset, and propose alternative ways to accomplish the overall integration objective now that I understand better how all the pieces fit together.
tl;dr
If you’re here because you just want to know how to authorize requests from your Vue/React/Angular frontend to your FeathersJS API backend when you already have a valid JWT from Auth0, take a look at the plugin that I wrote. There are detailed implementation instructions there. If you have any questions/suggestions/bug reports/feedback about the plugin, please submit them here.
Why Auth0?
In my last two posts, I explained why I choose to work with VueJS, and why I choose to work with FeathersJS. I haven’t yet discussed Auth0.
One of the most common coding scenarios in modern app development is user management. Nearly all apps have some form of account creation where users need to sign up, log in, manage (forgotten) passwords, update profiles, and have access to their own data. Despite the ubiquity of this functionality, there’s surprisingly little standardization, and it is shockingly common that developers will “roll their own” functionality for this each time they build a new app. And while user management is extremely common, it is also exceedingly difficult to do well–balancing usability with privacy and security concerns requires paying attention to a lot of little details that are easy to miss.

This is why authentication-as-a-service (AaaS) is such an important recent development. Between OAuth (Open Authentication protocol), MFA (multi-factor authentication), SSO (single sign-on) and confederated logins, OIDC (OpenID Connect), JWTs (JSON Web Tokens), JWKs and JWKS (JSON Web Keys and JSON Web Key Sets), there are a truly dizzying array of buzzwords, acronyms, protocols, and standards to navigate. Figuring out how to implement a user management strategy in this context is enough to make even the most experienced develop a bit queasy.

(Oops! Forgot Microsoft’s logo. I promise it wasn’t intentional!!)
On top of all of these standards, a number of industry players have stepped in to offer pre-built AaaS solutions. Among these are Auth0, Google’s Firebase Authentication, Amazon’s Cognito, Microsoft’s Azure Active Directory, PassportJS, Okta, Duo by Cisco, and OneLogin. Google and Amazon have leveraged the ubiquity of their cloud platforms (Google Cloud and AWS) to bundle and push their services to the general developer community, while players like Cisco have acquired companies like Duo and worked to integrate that solution for their pre-existing customers. Microsoft has been in the identity management game a long time with Active Directory, so the Azure extension was probably not a big reach for them. Okta and OneLogin bill themselves as enterprise solutions and cater to companies that prefer all the trappings that come with that. Passport is not a service so much as it is an open-source (MIT) library supported by Auth0. It has probably the narrowest scope of any of these providers, but at the same time is doing some of the most to develop and spread open standards. With the exception of Passport, none of these services are free, but several have a generous free tier for small projects, open-source, and/or not-for-profit apps.
Given the complexity and cognitive overhead, not to mention the investment in coding time it would take, I have not explored all of these solutions in depth. I have made a couple of attempts to implement Firebase auth, but have never followed it through to completion. Auth0 is the only service that I have thoroughly explored, and as such, is my AaaS provider of choice, and the one to which I’ll devote the rest of this post.
That being said, Auth0 has been around for several years now, and has invested enormous time and energy into building and promoting open industry standards around authentication. Not only do they sponsor the PassportJS project, but they also run JWT.io and are actively contributing to the development of the JWK and JWKS standards. They have one of the more generous free tiers of all of the services. They have extensive, detailed documentation of the wide variety of libraries and tools and standards that make up their product lineup. A majority of what I know about modern authentication standards, I’ve learned by reading the docs on Auth0’s site. They have an extremely active community, and whenever I’ve posted in their online forum, I’ve always received a response from a core team member within 24 hours, which is pretty amazing considering I’ve never actually spent any money on their service.
As you can tell, I’m a pretty big fan of Auth0. (I actually applied for a job there, but was very politely declined. ;)) You can tell that they are in it as much to make money as they are to promote security and privacy on the web. (Incidentally, they have also been active in the serverless space, with webtask.io, but that’s a subject for another blog post.) I’d encourage anyone reading this to give Auth0 a try. Maybe you’ll even give my plugin a try!
How I got bogged down
So, as I alluded to in the intro to this post, I recently got stuck for about a week trying to implement a solution for authorizing API calls to my FeathersJS server from my VueJS SPA in which I’d already logged in using Auth0’s hosted login service.
I was pretty excited about implementing this. I thought it would be a cinch because, helpfully, Feathers provides an authentication library that already has out-of-the-box generator support for Auth0. I dove right in, and was encouraged by the fact that there were spots in the configuration file for me to paste in my client_id and client_secret that are provided by Auth0. From there, though, it began to get ugly as I received a number of confusing and unhelpful error messages like error:0906D06C:PEM routines:PEM_read_bio:no start line which sent me down a long series of rabbit holes. At one point I even configured a debugger and stepped through the Feathers authentication library line by line to try to figure out what was going on until I realized…

I had fallen victim to one of the classic blunders: I was confusing authentication with authorization. Even though I’ve explained the difference between the two countless times to my students, it still tripped me up. For those of you who are new to this, it’s pretty easy to explain the difference:
- Authentication is when you’re trying to confirm identity, i.e. that someone actually is who they say they are
- Authorization is when you are trying to figure out if it’s okay to let them do what they’re asking to do, i.e. to give permission
This is a two-step process, that anyone who has ever tried to order a beer will understand. When the server at a restaurant looks at your ID, they first compare the picture on the ID to the person sitting in front of them (i.e. you) to authenticate that you are actually the subject of the ID. Then they read the date of birth on the ID to confirm that you’re actually old enough to order alcohol, i.e. whether or not you are legally authorized to buy a beer. Although related, they are two distinct processes from a security perspective. I had been lured by the enticing possibility of a pre-generated solution into ignoring the distinction, at my peril.
Needless to say, three days in when I finally figured this out, I felt pretty stupid. What I realized is that by the time users of my app were making API calls, they had already been authenticated! I didn’t need to use Feathers for authentication because that step had already happened. However, it was important that any calls to the API be authorized to prevent people from accessing and/or modifying and data to which they should not have access.
The Feathers authentication library is designed with the assumption that you are using Feathers to provide both the frontend and the backend. Out of the box, Feathers has a public/ folder from which you can serve static HTML pages. In fact it would be an ideal place to drop in a Vue/React/Angular app that had already been built. I suppose I could have organized my architecture this way, but I didn’t understand that it was meant to be used like that, and I had already decided to have my API server be completely separate from my frontend server. And since Auth0 strongly encourages developers to use their hosted login pages, it seemed counterintuitive that I would develop my own from within my Feathers API. It’s also not immediately clear to me how one would setup a project where the frontend Vue parts co-existed with the backend Feathers parts. If I figure that out, I’ll be sure to blog about it.
At any rate, from that point, implementing a solution was fairly straightforward, and resulted in my publishing an authorization hook designed to work with Feathers and Auth0.
Overcoming old mindsets
I’m currently 45, which I guess is pretty old in developer years. (I recently interviewed at a company where I realized I would be older than everyone in the company except the CEO, who is less than 2 years older than me.) At any rate, the bulk of my developer experience has been with MVC frameworks like Rails, Django, and Laravel. Even though it’s not strictly MVC, WordPress and pretty much every other web app for the past 20 years has operated in pretty much the same way:
- From a login form, the user submits a username/password combo that is sent directly to your app
- The app (salts) and hashes the password and checks it against the value stored in the local database on the server
- If everything checks out, the server generates a random session ID, keeps a copy in memory on the server, and sends a copy back to the client, where it is stored in the browser, usually in a cookie
- From that point on, whenever the client makes a request to the server, it sends the session ID along with the request. Assuming nothing has changed, the server will confirm the session ID on each request and respond with the data requested
In these MVC scenarios, there was usually no such thing as a separate API server. There was no distinction between the app and the API. The session ID was not portable, i.e. it couldn’t be used to authenticate to any other app or service. If the cookie was deleted, as when the browser window was closed, the session was ended and the user would have to re-authenticate, although it is, of course, possible to make it so the session IDs can remain stored even when the browser is closed and re-opened.
In the new OAuth world, this is not how we do authentication anymore. Now, the process goes something like this:
- Typically, the user still submits a username/password combo via a login form, although this form may or may not be on the site to which they are requesting access. Frequently, they will be asked for a second (or third!) form of identity (this is 2FA–two-factor authentication), such as biometrics, or a temporary password generated by special authenticator software (e.g. Duo or Google Authenticator), or sent to them in a place only they can receive it like their cell phone or email address.
- If both forms of authentication check out, then the authentication server will issue a “token” (which is really just a long string of characters). The token consists of some information relevant to the user that has been encoded (but NOT encrypted, meaning anyone can de-code the info part), as well as a “signature” that is encrypted and has been digitally signed using a private encryption key that is known by means of the PKI (public key infrastructure) to be unquestionably owned by the authenticating entity.
- Once the user has obtained their token, they can use it to gain access to any site or app that chooses to accept it. Sites that accept tokens can verify their authenticity by attempting to encrypt the contents of the token using what is known as the “signing key,” which is a public key generated from the same private key used to generate the token. Signing keys are published in a standard, known location. So when an app or API receives a request with a token attached to it, they will:
- Retrieve the signing key via HTTPS from the entity that generated the token
- Use it to encrypt the contents of the token
- Compare the encrypted result to the signature that was sent with the token
- Only tokens which were generated using the private key owned by the authenticating entity will produce the correct signature, and as such be verified
- After the app has verified the authenticity of a token, it can then decide whether or not the requester is authorized to do what they’ve asked to do. Apps or APIs may also choose to cache the tokens so that in future requests, they can just compare the previously verified token to the one being sent. If they match, there is reasonable assurance that the request is coming from a legitimate source.
While this new means of authenticating and authorizing user requests is clearly more labor intensive, it is also considered to be more secure than the old way, particularly when 2FA is used. It also has the added benefit of enabling the same token to be used across multiple sites, APIs or apps. This explains the rise over the last several years of sites asking you if you’d like to “Log in with Google!” or “Log in with Facebook!” (as pictured to the right). Since Google and Facebook (and many other identity providers, as they’re called) are trusted entities that issue tokens, apps can save themselves the headache and the risk of creating and maintaining their own databases of username and password combos. They can do this in addition to or instead of the traditional username and password approach. In Auth0’s case, they will take the responsibility of maintaining the username/password combo database on your behalf, and free you, the app developer and maintainer, up to focus on the amazing content or service your app provides.
So, because in my old mindset, there was little distinction between authentication and authorization–they typically happened together as part of the same workflow–I failed to recognize in this case that I no longer had to deal with the authentication step, and instead only needed to focus on the authorization part. And now, because I am old, and a dad, I must provide the obligatory dad joke… wait for it… yes, I guess you can teach an old dog new tricks.
So how did I solve the puzzle?
Once I finally understood what my problem was, the implementation of the solution was relatively straightforward and accomplished with open-source libraries available via npm. Assume you have the following architecture pictured below: A) a frontend app built with a framework like Vue, React, or Angular, B) an authentication app created at Auth0, and C) a separate API server running FeathersJS.
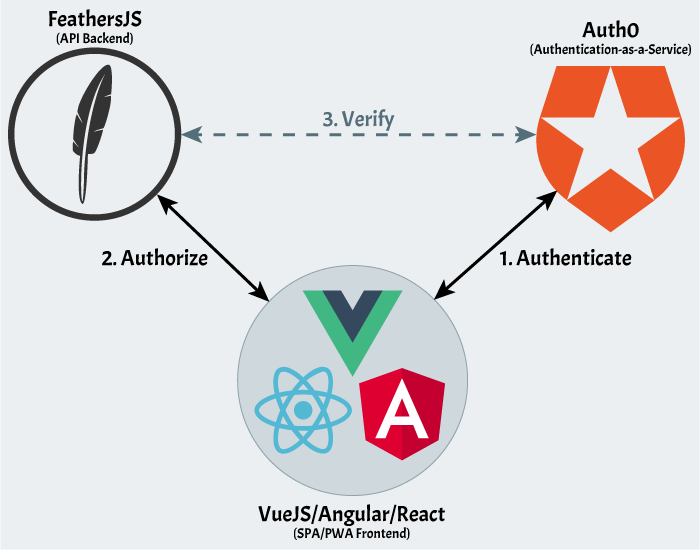
The process of making a successful request to the API works as follows (Note: in the following explanation, when I say “app” I’m referring to the Vue/React/Angular app. When I’m referring to Feathers, I’ll say API, and Auth0 is just Auth0.):
- Authentication
- From the app, the user clicks the “Login” button which redirects them to a securely hosted login page at Auth0
- Auth0 collects the information needed to authenticate the user. This can be one of a variety of things including 3rd party logins (Google, Facebook, Twitter, GitHub, etc.), an email/password combo, and potentially a 2nd form for 2FA.
- If successful, Auth0 sends a token back to the app.
- Authorization
- The app now sends a request to the API server, and attaches the token. How the token is attached is up to the developer. It can be in the body of the request, sent as a header, or a cookie. In my case, I chose to put the token inside of an
Authorizationheader with theBearerprefix. This is a more or less standard practice, BUT this won’t work if you’re trying to be authorized to use a realtime socket.io/primus service on the API, because socket connections don’t have headers. In my case, I’m only interested in authorizing REST requests. - The API will then:
- Confirm that the
Authorizationheader has been sent - Extract the token from the header and decode it. As mentioned earlier, decoding can be done separate from and without verification BUT you should NOT trust the contents of a token until it has been verified.
- Get the
user_idfrom thesubclaim in the token - Try to retrieve the user with the
user_idfrom a data store on the API server - Check to see if the user already has a currently stored and verified token; if so, the request is authorized and we’re done
- If a verified token has not already been stored for this user, the API will then get the signing key directly from Auth0. There may be multiple signing keys stored at Auth0 for the Auth0 app. The token contains an ID (called the
kidor Key ID) that indicates which signing key is the correct one. Once retrieved from Auth0, signing keys are cached on the API server to avoid the need for unnecessary HTTP requests. - Once the signing key is obtained, the API will attempt to encrypt and verify the token.
- If the token is verified, the API will attempt to store the verified token in a data store associated with the
user_idto prevent the necessity of re-verification of the token on future requests - The API will then authorize the original API request to proceed, whatever it was
- If any of the above steps fail, the request is NOT authorized and an HTTP 401 status code is returned to the app along with an error message that explains the problem.
- Confirm that the
- The app now sends a request to the API server, and attaches the token. How the token is attached is up to the developer. It can be in the body of the request, sent as a header, or a cookie. In my case, I chose to put the token inside of an
The above algorithm is the one implemented in my @morphatic/feathers-auth0-authorize-hook plugin, which can be installed via npm. Feel free to read through the actual code over on GitHub. There are also instructions there for how to integrate the plugin into your app/API solution.
How else might I have solved this?
Now that I understand this whole process better, I might have made a couple of different architectural decisions.
Combine the App and API into one server
Since Feathers doesn’t really care what you put into its public/ folder, I could use that as the location for my Vue app. This would have the benefit of allowing me to host both the app and the API at the same domain. It could also allow me to actually use the feathers authentication plugin, and make my authorization plugin unnecessary. This might be tricky to pull off in practice for a number of reasons:
- Since the Vue app is just static HTML and uses the Vue Router to handle navigation, integrating that with Express might be challenging. You’d have to come up with some way to handle API requests with Express, and route all other requests through the Vue Router. This is probably possible, but I’m not immediately clear what that would look like.
- Also, since Vue and Feathers use a bunch of the same directory names by default (e.g.
src/andpublic/) you’d have to think carefully about folder names when generating both of them. You’d probably have to manually merge the two projects, which probably means losing the benefit of the CLI tooling both frameworks provide. I’m not sure the benefit is worth this hassle. - Of course, you could still develop the app and the API in totally separate directory structures, and just drop the Vue app directly into the
public/folder after it’s built. This would be pretty straightforward but we’d still have the problems in #1 above to deal with.
I think this may actually be one of the architecture scenarios envisioned by the developers of Feathers, but I don’t think I’ve seen any example apps that integrate Vue/React/Angular into the Feathers structure in quite this way. It might be worth it to throw together a sample app just as a test case to see if this could work.
Send the Auth0 post-login redirect through the API
One of the steps of configuring an Auth0 app is to specify a redirect URL for your app. After someone logs in using Auth0’s hosted login page, it will send them back to whatever URL is specified. I suppose it’s possible that this post-login handler could be sent to the API, which would listen for such requests, and store the token before sending it along to the app. This would obviate the need for the token verification step provided by my plugin since the API would be receiving the token directly from Auth0. I’m not sure it’s possible to send the post-login redirect to a different domain than the original login request, and this feels like a non-standard authentication scenario that is ripe for exploitation.
Final Thoughts
Given all the time and effort I put into coming up with my current solution, which I know works, I’m a bit reluctant to throw all of that out in favor of one of the scenarios I’ve just described. There’s a lot of merit in just keeping the app and API separate and not trying to come up with a non-standard configuration for either or both of them. Custom configurations like that make it difficult to onboard new team members who are used to the standard configurations. It also makes it more likely that you’ll end up having to customize a dozen other processes during the lifetime of your app. I guess I won’t really know unless I try them. If and when I do, I’ll be sure to blog about it here.
If you’ve read this far, thank you! I hope it has been as valuable for you to read this as it has been for me to write it. Nothing quite consolidates learning so much as trying to explain it clearly to other people. I used to wonder why people wrote such wonderful tutorials on the web. How could they possibly have the time to devote to telling other people how to do stuff? It wasn’t until I started writing my own tutorials that I realized that one of the key goals of writing a tutorial is so you don’t forget what you yourself have learned!
In this post, I set out to capture my learning process, pinpoint why it took me so long to break out of an old mindset, and propose alternative ways to accomplish the overall integration objective. I hope I’ve done that. Thanks for reading and please feel free to provide feedback/comments/questions below!
Useful, thanks. Any tips on how to handle the websockets complication you alluded to?
Thanks for this writeup, very educational.
Really appreciate this article!
Any detail how your extracted the Auth0 headers on the Vue side?
The only time the frontend needs to interact with Auth0 directly is on login. Pretty sure I used the auth0-js package on NPM to do this. It essentially grabs the query string parameters from the redirect URL after you’ve logged in. After that, I stored the access and id tokens in local state using Vuex, and then use axios to add the access token to the authorization header when making API calls. You could just as easily use fetch, but I never got around to switching.