This is a tutorial on how to develop and deploy a secure REST API with JavaScript-based tools.
Recently, I’ve been working with a lot of my students on PWA’s (progressive web apps), and also on cross-platform mobile apps built with the Ionic Framework. One of the things my students quickly discover is that for any app that allows any sort of information to be shared between different users of the app (or between different devices for the same user) their data needs to live in the cloud. In practice, this means that they need to build a REST API on the server where their data will live.
There are many good choices of REST API programming frameworks, but since my students are primarily using Angular (Ionic also uses Angular under the hood), I decided to come up with a strategy that uses only JavaScript/NodeJS based solutions. I also decided to use MongoDB as my database backend, partly because I previously didn’t have a lot of experience with NoSQL databases, and partly because, the more I researched them, the more I became convinced that Mongo was going to be a better fit for the majority of apps my students wanted to build.
In the end, here are the tools and services I decided to use:
- VirtualBox and Vagrant for my development server
- DigitalOcean for my production server
- Auth0 for implementing user accounts, authentication, and authorization
- Node Express for implementing the API server
- Mongoose for setting up my data models and connecting to MongoDB
FYI, I use Sublime Text as my code editor, but really, any editor should work. Also the full source code for the REST API I’m about to show you is available on GitHub. Feel free to check it out, fork it, or whatever you’d like with it.
Step 1: Deciding What to Build
One of my favorite projects that my students are currently working on is Dialoggr, a mobile app to help people with type 1 diabetes mange this chronic condition. This app is being built with the Ionic Framework v2. Rather than build their own user management system from scratch, I directed my students to use Auth0, a drop-in identity management service with extremely generous free-tier services for open-source apps. With Auth0, developers can very easily use JSON Web Tokens (JWT) along with their Auth0 credentials to authenticate and authorize users on 3rd party apps and services (like a remote REST API!). A high-level view of the network architecture follows:
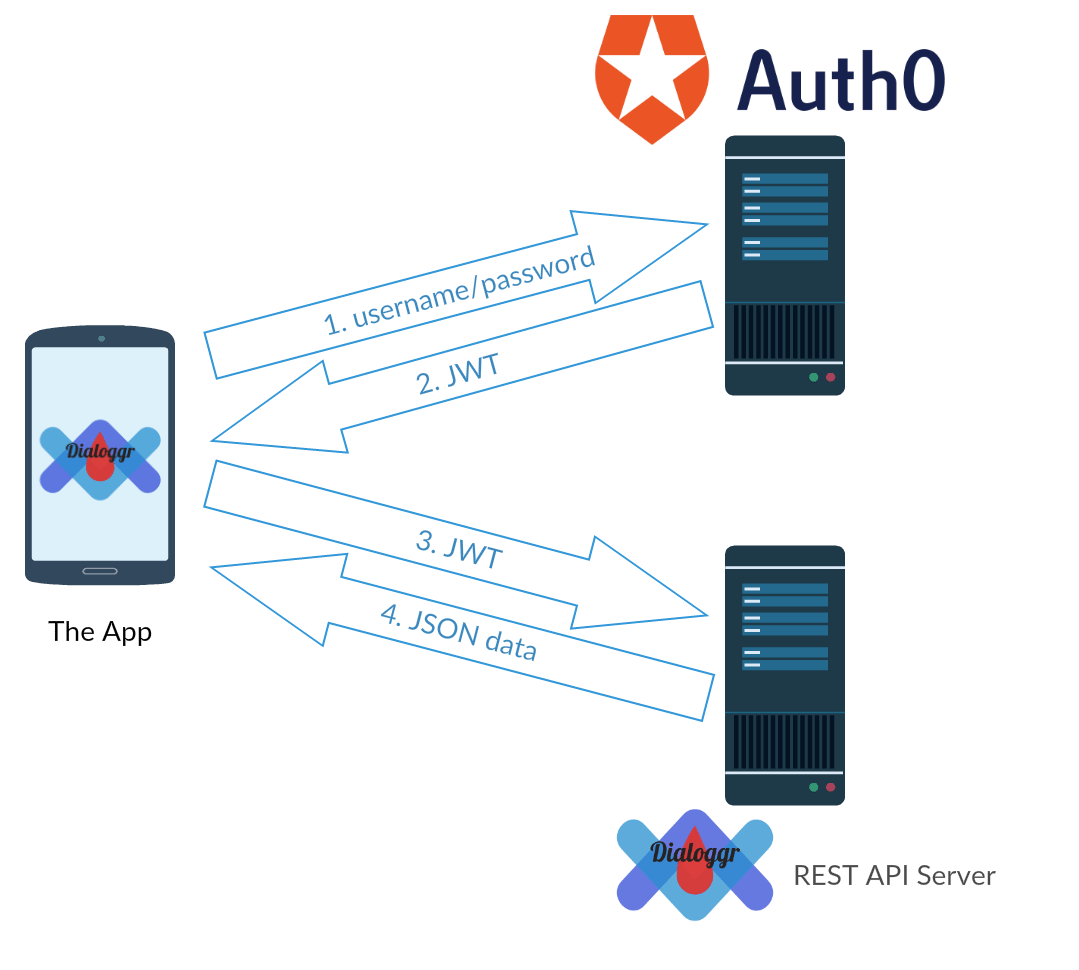
App + Auth0 + REST API Architecture
When users log into the app, 1) their username and password get sent to Auth0, which verifies their identity and 2) sends back a JWT. From then on, whenever the app needs to get data from the API server, rather than send the username/password, it 3) sends the JWT. The REST API server is able to use the JWT along with the client ID and client secret for the Auth0 service to authenticate and authorize the app. The API server can then 4) send data back to the app.
What is this data going to look like? Before you build your REST API, you have to decide what data you’re going to be storing on your server. Dialoggr (v1) allows diabetics to keep track of three types of data on a day-to-day basis:
- Blood sugar (glucose) level or “bgl”
- Carbs eaten
- Amount and quality of sleep
The person using the app would manually enter these values in throughout the day, or may have them automatically sent to the app (e.g. via Bluetooth) from a wearable device like a continuous blood glucose monitor, or a FitBit. The app would then download these values and use them to generate graphs or other visualizations of the trends in these values over time. At first, we thought it would be necessary to store all of this information in a separate table for each type of data, but as we thought about it, we realized that each “data entry” could be captured completely with the following JSON structure:
{
  "user": "585c564f5dab3d7c3a3afb54",  // user ID from Auth0
  "type": "carbs",                     // or "sleep" or "bgl"
  "value": 30,                         // number of "carbs"
  "start": "2017-03-25T13:00:00.000Z", // when entry happened
  "end": "",                           // used only for "sleep"
  "description": "bowl of cereal",     // more info on entry
  "createdAt": "2017-03-25T13:27:44Z", // when added to DB
  "updatedAt": "2017-03-25T19:04:26Z", // when updated in DB
}
It should be noted that in addition to the above fields, MongoDB will automatically insert an _id attribute for each data entry. Our REST API will therefore have to implement the following five routes, in order to store, manage, and retrieve this data:
GET /entries: retrieve all entries (of a particular type) for a given userPOST /entries: add a new entry to the DBGET /entries/:id: retrieve the entry with the specified_idPOST /entries/:id: update the entry with the specified_idDELETE /entries/:id: remove the entry with the specified_id
The rest of this tutorial will focus on:
- How to set up development and production servers for the REST API
- How to consume data from the REST API from an Angular/Ionic app
Step 2: Getting Started with Auth0
The first step in this process is signing up for an Auth0 account, and then incorporating their authentication code into your app. They have fantastic documentation on how to do this in one of their Quickstart tutorials.
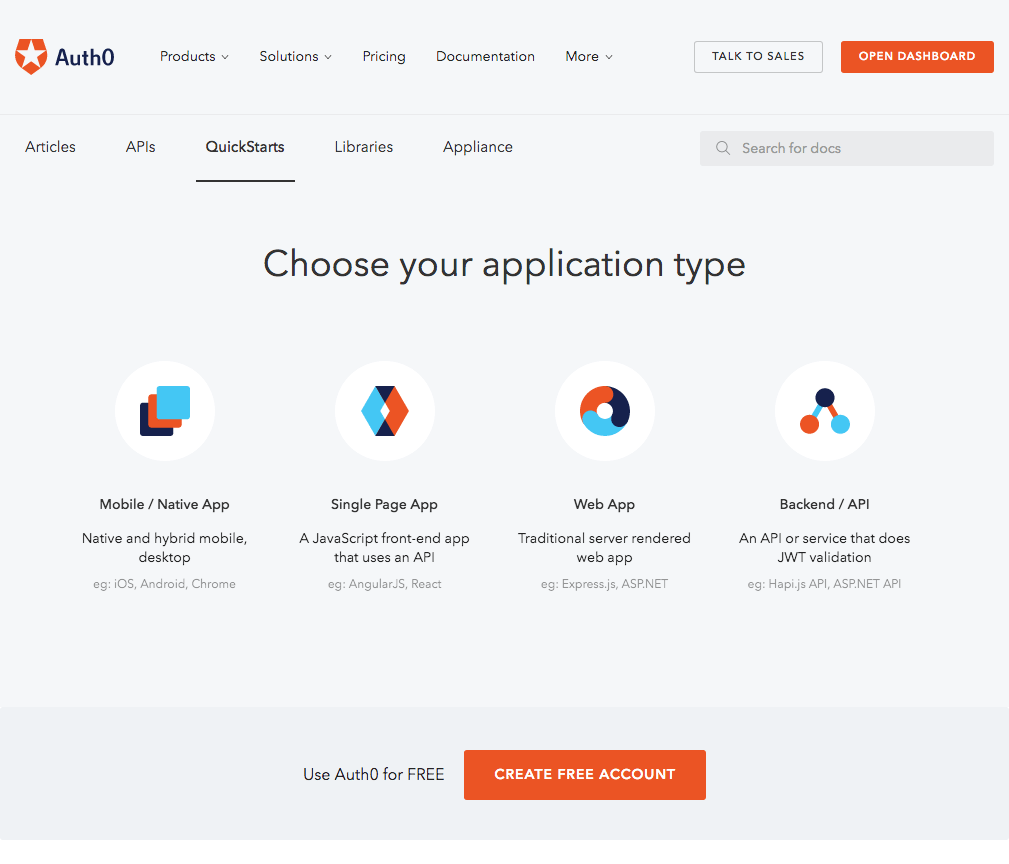
Auth0 Quickstarts Documentation page
These tutorials are updated frequently to keep pace with new releases in their software. For Angular, choose “Single Page App > Angular 2” and for Ionic, choose “Mobile/Native App > Ionic 2“. Once you have followed their tutorial, you should be able to start up your Angular/Ionic app, run it locally with ng serve or ionic serve, and then authenticate to your app using Auth0. Once this has happened, you will have a JWT stored locally in your app that you can use to connect to your REST API.
Step 3: Setting up a Development Server
For local development, I chose to set up a virtual machine running Ubuntu 16.04 which mirrors the exact same setup that I will have on my production server. In order to do this, follow this tutorial that I wrote for getting a Loopback development box running with Vagrant and VirtualBox. NOTE: you can safely skip Step 6 of that tutorial, since we’re not going to be using Loopback this time (although I plan to do a future tutorial which demonstrates this same process using Loopback and Swagger). Once you’ve created your virtual machine, go ahead and vagrant ssh into it, and cd api into your API folder.
Step 4: Install MongoDB on the Server
Follow these instructions for installing MongoDB on your server. In addition to these instructions, you’ll also need to do the following to tell Ubuntu to automatically restart Mongo whenever the system restarts. Create a file at /etc/systemd/system/mongodb.service by typing the following at the command line:
$ sudo nano /etc/systemd/system/mongodb.service
Paste the following code into the file and then hit CTRL + x to exit, y to save and then enter to get back to the command line:
[Unit]
Description=High-performance, schema-free document-oriented database
After=network.target

[Service]
User=mongodb
ExecStart=/usr/bin/mongod --quiet --config /etc/mongod.conf

[Install]
WantedBy=multi-user.target
Then type the following command to enable the service:
$ sudo systemctl enable mongodb
It is not necessary to adjust the firewall since we’ll only be accessing MongoDB locally from our REST API server.
Step 5: Initialize the REST API Server
We’re going to save our server code on GitHub, so from the terminal, inside your virtual machine, initialize the /api directory as a new git repo by typing git init at the command line. Create a README.md file by typing touch README.md and create a .gitignore file by typing touch .gitignore on the command line. Open up these two files in your text editor. Type up a useful description of your app in the README file, and copy and paste the contents of this .gitignore file into yours, and save them both.
Next, we’re going to install the necessary npm packages. Start by typing npm init and answering all the questions you are asked. You can safely accept the default answers for all of them. Then install all of the necessary packages by running this command:
$ npm i -S express express-jwt dotenv body-parser mongoose
You’ll also want to install a process manager to help you keep your server alive while running it. In my test repo, I’ve used nodemon, but on my production server I’ll be using pm2. Either one is fine. If installing nodemon, I would only install it as a dev dependency, i.e. npm i -D nodemon.
Now we need to create the file in which we’ll actually write the main code for our server. Type touch server.js on the command line. Now that we have created all of the basic files, it would be a good time to commit the changes:
$ git add .
$ git commit -m "created REST API server skeleton"
$ git push
We’ll come back to add the code into server.js in a bit. First, lets create our model.
Step 6: Define the Data Model
We’ve only got one simple model in this app that represents one data entry in our data log for our diabetes management app. If we had more than one model, I might recommend putting all of your models in a subfolder called models, but since there’s only one, create a file called entry.js in the root directory of your project, open it up in your text editor, and paste in the following code:
let mongoose = require('mongoose');
let Schema = mongoose.Schema;
let EntrySchema = new Schema({
  user:  { type: String, required: [ true, 'You must specify a user' ] },
  type:  { type: String, required: true , enum: [ 'carbs', 'bgl', 'sleep' ] },
  value: { type: Number, min: [ 0, 'Value entered must be at least zero' ] },
  start: { type: Date, default: Date.now },
  end:   { type: Date, default: null },
  description: String
}, {
  timestamps: true, // adds createdAt and updatedAt fields automatically
  minimize: false   // will make sure all properties exist, even if null
});
EntrySchema.index({ user: 1, type: 1 });
module.exports = mongoose.model('Entry', EntrySchema);
I developed this model from the sample JSON object that I sketched out earlier in Step 1, and used the Mongoose documentation to figure out how to specify things like validation parameters. I strongly encourage you to take the time to read through all of the Mongoose documentation until you fully understand all of the properties that you can specify here. It’s very powerful, and will save you a ton of time down the road.
Step 7: (Optional) Create Custom Error Classes
Strictly speaking, this step isn’t necessary, but I like getting rich feedback from my API to tell me when things don’t go as expected. In my project, I created several custom error classes that you’ll see that I’ve used later on. Here’s an example of one of them, bad-request.js that I’ll use to let consumers of the API know that they’ve forgotten to pass one or more required parameters along with a request:
'use strict';
class BadRequestError extends Error {
  constructor(message, extra) {
    super();
    Error.captureStackTrace(this, this.constructor);
    this.name = 'BadRequestError';
    this.message = message || 'One or more required parameters are missing from your request.';
    this.extra = extra;
  }
}
module.exports = BadRequestError;
You may notice that this follows the updated ES6 syntax, and will only work with more recent versions of node.
Step 8: Specify the Routes
We could specify the route definitions inside of server.js if we wanted, but in order to keep that file short and manageable, I decided to put the route definitions in a separate file called routes.js that contains the following code:
'use strict';
let mongoose = require('mongoose');
let Entry = mongoose.model('Entry');
module.exports = app => {
  app.route('/entries')
    .get((req, res, next) => {
      Entry.find(req.query, (err, entries) => {
        if (err) { return next(err); }
        res.json(entries);
      });
    })
    .post((req, res, next) => {
      let e = new Entry(req.body);
      e.save((err, entry) => {
        if (err) { return next(err); }
        res.json(entry);
      })
    });

  app.route('/entries/:entryId')
    .get((req, res, next) => {
      Entry.findById(req.params.entryId, (err, entry) => {
        if (err) { return next(err); }
        res.json(entry);
      });
    })
    .post((req, res, next) => {
      Entry.findOneAndUpdate(req.params.entryId, req.body, {new: true}, (err, entry) => {
        if (err) { return next(err); }
        res.json(entry);
      });
    })
    .delete((req, res, next) => {
      Entry.findOneAndRemove({ _id: req.params.entryId }, (err, entry) => {
        if (err) { return next(err); }
        res.json(entry);
      });
    });
};
Note here that we’ve specified the five routes that we decided we’d need way back in Step 1. Be careful here because although similar, the Mongoose query syntax is NOT the same as the MongoDB query syntax. You should definitely spend enough time reading the documentation to understand how the two systems are alike and different.
Step 9: Write the Main Server Code
And without further ado, here is the code for server.js:
// import libraries
let exp = require('express');     // to set up an express app
let jwt = require('express-jwt'); // for authentication with Auth0 JWT's
let bp  = require('body-parser'); // for parsing JSON in request bodies
let mng = require('mongoose');    // for interacting with MongoDB

// import Error classes
// NOTE: UnauthorizedError is built into express-jwt
let BadRequestError    = require('./errors/bad-request');
let ForbiddenError     = require('./errors/forbidden');
let RouteNotFoundError = require('./errors/route-not-found');

// load environment variables
require('dotenv').config();

// connect to MongoDB
mng.Promise = global.Promise;
mng.connect('mongodb://localhost/dialoggr');

// import model
let Entry = require('./entry');

// initialize app
let app = exp();

/**
 * Preflight Middleware
 */
// CORS
app.use(function(req, res, next) {
  res.header("Access-Control-Allow-Origin", "*");
  res.header("Access-Control-Allow-Headers", "Origin, X-Requested-With, Content-Type, Accept, Authorization");
  next();
});

// auth0 JWT; reject requests that aren't authorized
// client ID and secret should be stored in a .env file
app.use(jwt({
  secret: process.env.AUTH0_SECRET,
  audience: process.env.AUTH0_ID
}));

// parse JSON in the body of requests
app.use(bp.json());

/**
 * Routes
 */
let routes = require('./routes');
routes(app);

/**
 * Postflight Middleware
 */
// handle 404's
app.use((req, res, next) => {
  next(new RouteNotFoundError(`You have tried to access an API endpoint (${req.url}) that does not exist.`));
});

// handle errors (404 is not technically an error)
app.use((err, req, res, next) => {
  switch(err.name) {
    case 'BadRequestError':
      res.status(400).json({ name: err.name, message: err.message });
      break;
    case 'UnauthorizedError':
      res.status(401).json(err);
      break;
    case 'ForbiddenError':
      res.status(403).json({ name: err.name, message: err.message });
      break;
    case 'RouteNotFoundError':
      res.status(404).json({ name: err.name, message: err.message });
      break;
    default:
      res.status(400).json({ name: err.name, message: err.message });
  }
});

// start server
app.listen(8080, () => {
  console.log('Dialoggr API listening on port 8080!');
});
With any luck, the comments in the code explain most of what is happening here. There are some elements that I found confusing, which I’ll explain now.
“Middleware” is the stuff you find in app.use(...); statements. In some (most?) tutorials I looked at, the middleware was defined before the routes were defined. However, I learned that some middleware, e.g. jwt, CORS, and body-parser, have to come before the routes are defined, while other middleware, e.g. 404 handlers and error handlers, come after the routes are defined. I’ve divided these into “preflight” and “postflight” middleware sections in my code.
I also learned that a 404 (File Not Found error) is not considered an “error” in Express. That’s why it has a separate middleware handler all of its own. That one kinda threw me off.
The CORS middleware specified here should allow access to this API from any domain. This is probably NOT the best solution. In fact, I’m sure that it’s not. However, since I’m still in development mode, I made it as open as possible. After I get everything working the way that I would like, I will update it to follow best practices for CORS.
Around line 36 you’ll notice that I’ve set up the JWT middleware. The secret and audience properties of the jwt() function correspond to your Auth0 Client Secret, and Auth0 Client ID respectively. Since, as the name implies, these values should be secret, you don’t want to store them in the actual code that gets uploaded to your GitHub repo. Instead, we store them in a separate file that you have to create manually. The file is named .env, is stored in the root directory of your project, and has contents that look like this:
AUTH0_SECRET=WihxWesgoeso1mg3JnGzfHcawZbt2I4dhHR7MG0QMlvXE3ujnP5QUgZ2ksvYht41
AUTH0_ID=w2Vozi5gZz1WSdMfhO4n01vIOVJuhoeO
Note: these are NOT my real client secret and client ID. The trick is that the dotenv package which is loaded on line 14 (require('dotenv').config()) will look for the .env file, grab its contents and save the variables defined there as children of process.env. So, if you have the correct client ID and secret stored in your .env file, and the HTTP request made to your includes a header that looks something like this:
Authorization: Bearer eyJhbGciOiJIUzI1NiIsInR5cCI6IkpXVCJ9.eyJzdWIiOiIxMjM0NTY3ODkwIiwibmFtZSI6IkpvaG4gRG9lIiwiYWRtaW4iOnRydWV9.TJVA95OrM7E2cBab30RMHrHDcEfxjoYZgeFONFh7HgQ
And if that long gobbledygook string after “Bearer ” is actually a valid JWT (that you got from Auth0 when you logged into your app), your REST API server will be able to securely authenticate the request. I don’t know about you, but I find that truly amazing.
Finally, you may want to comment out the JWT stuff from server.js while you’re still working on developing your routes and your other middleware. You’ll of course uncomment it when your API is live, but it would be a pain to have to get a JWT manually so that you can test things.
Step 10: Run your code
Once you’ve gotten this far, you’d probably like to test it out. One way to do it is to use a tool like Postman. I got this idea from this other tutorial on creating REST APIs. While that’s cool and all, it’s not as good as developing your API using good test-driven development style. This tutorial is already long enough, so I’m going to have to put the TDD part of the API development off for another day. At any rate, to run your code, type the following from the command line within your virtual box:
$ nodemon server.js
Then if you visit http://192.168.33.10:8080 (or whatever IP address you assigned to your Vagrant instance in your Vagrantfile back in Step 3) in a browser, you should see something like:
{
  "name": "RouteNotFoundError",
  "message": "you have tried to access an API endpoint (/) that does not exist."
}
That’s because our API does not define anything interesting at the default route (i.e. /). If you visit http://192.168.33.10:8080/entries, however, you should see something like [], i.e. an empty set of square brackets to indicate that you got back an empty set of data entries. Of course! We haven’t added anything to the database yet!!
Step 11: Consume the API from Angular/Ionic
Okay, so now that you’ve got your API up and running, you’d like to uncomment the JWT stuff in server.js and see if you can access the API from your app. Assuming you followed the Auth0 tutorials in Step 2 carefully, you should have a file in your app that is at a place like src/app/services/auth.service.ts. That’s the service that handles logging into your app and getting your JWT from Auth0. We’re going to create another file in the same directory, next to that one called src/app/services/api.service.ts. In that file you’ll want to put the following code:
import { Injectable } from '@angular/core';
import { Http, Response, Headers } from '@angular/http';
import { Observable } from 'rxjs/Rx';
import { Auth } from './auth.service';

import 'rxjs/add/operator/map';
import 'rxjs/add/operator/catch';

@Injectable()
export class Api {

  private api_url: string;

  constructor(private auth: Auth, private http: Http) {
    this.api_url = 'http://192.168.33.10:8080/';
  }

  // create a function to get data from our API
  get(path: string = "", type: string): Observable<any> {
    // is this person logged in?
    if(this.auth.authenticated()) {
      // get the JWT
      let token = localStorage.getItem('id_token');

      // get the user's ID from their profile
      let user = localStorage.getItem('profile');
      let userId = user.identities[0].user_id;

      // set up the query string
      let qs = `?user=${userId}&type=${type}`;

      // set the Authorization and Content-Type headers
      let headers = new Headers();
      headers.set('Authorization', `Bearer ${token}`);

      // fetch the result
      return this.http.get(this.api_url + path + qs, {headers: headers})
                      .map((res: Response): any => res.json())
                      .catch((error: any) => Observable.throw(error.json().error || 'Server error'));
    } else {
      // NOT logged in; maybe redirect to the login page?
    }
  }
}
This creates an injectable API service in your app that you can use in your pages to get data from your REST API. In this example, I have not created a post() method that would allow you to update resources on the server, nor a delete() method that would let you remove resources from the server, but hopefully you’ll be able to figure those out.
As an example, assume you had a page in your app at src/app/pages/page1/page1.component.ts, and that the code on that page looks something like this:
import { Component } from '@angular/core';
import { Api } from '../../services/api.service';
import { Entry } from '../../models/entry';

@Component({
  templateUrl: `./page1.component.html`,
  styleUrls: ['./page1.component.css']

})
export class Page1Component {

  public entries: Entry[] = [];

  constructor(private api: Api) {
    // make a request to the /entries route of our API
    this.api.get('entries', 'carbs').subscribe(res => {
      this.entries = res;
    });
  }
}
This assumes that you have defined your Entry model in a file at src/app/models/entry.ts that defines the interface for your model like so:
export interface Entry {
  _id: string;
  user: string;
  type: string;
  value: number;
  start: string;
  end: string;
  description: string;
  updatedAt: string;
  createdAt: string;
  __v: number;
}
In your template file, then, you could loop through all of the entries that were returned by the API call and display them in some fashion.
Step 12: Deploy API to Production Server
I’m going to show you how to do this at Digital Ocean, my favorite web host. Basically, you’ll want to follow this tutorial on how to set up a NodeJS app for production on Ubuntu 16.04. However, in addition, you’ll need to use the same procedure you did earlier to install MongoDB on the server. Also, instead of the hello.js server that they create in the tutorial, you’ll want to clone your REST API code from GitHub, or wherever it is you have it stored. You’ll have to manually recreate your .env file in the root directory of your server. This tutorial shows you how to use Nginx as a reverse proxy server, and PM2 as the process manager that keeps your API service up and running even if the machine has to reboot. It also shows you how to set up a free SSL cert using LetsEncrypt. Using SSL is super important for running a REST API in production.
Conclusion
If you’ve made it this far, congratulations!!! This was kind of a marathon post, but it took a long time for me to figure all this stuff out, and I didn’t want to forget it. I also wanted a comprehensive reference for my students who are building REST API’s for their own Angular and Ionic apps.